


I use white solid fabric for my labels. The size can vary but I tend to make them big as a souvenir card if the quilt is a big one.
Cut out a piece of fabric slightly bigger than a souvenir card, maybe 1/2 inch-1 inch/ 1 1/2 cm-2 cm bigger (picture 1). Also cut out a piece of light weight iron on interfacing/stabilizer, just the size I want the label to be (picture 2). Lay the interfacing/stabilizer centered on the fabric and iron it on (picture 3). Fold over the left over fabric and iron it around the stabilizer, one side at the time starting with the long sides, to form folded squares that I will cut out in the corners (picture 4).

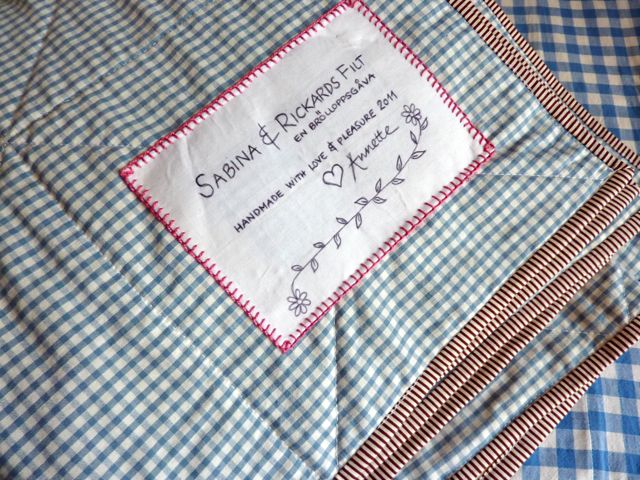
Kärlek
Annette
Did you find this tutorial helpful?
Donate 1 dollar to support My Rose Valley Blog.
Thank You!
Donate 1 dollar to support My Rose Valley Blog.
Thank You!
Veldig fin label, takk for tutorial:-)
ReplyDeleteTusen takk også for fine kommentarer på bloggen min! Det er så fint at man kan være til inspirasjon for hverandre.
God helg!
Such a simple tutorial but sooo pretty, will def try to do some on my 2 baby quilts for mexico, love how it looks :)
ReplyDeleteKaren x
Thank you so much for sharing that. I admired your label when I saw your finished quilt post and wondered how you did it. It makes a special gift extra special.
ReplyDeleteLove
Tickety-boo
xx
Excellent! Ive just finished a quilt for my mum and wasnt sure what to stitch in!
ReplyDeleteYou have lovely hand writing Annette, i really like the little flower vine at the bottom. Thank you for the tutorial x
ReplyDeleteIt's not neat. It's amazing! I think I would cry from joy over a gift like that. The quilt in the photo is magnificent, and the label makes it so special.
ReplyDeleteHi Annette!
ReplyDeleteThank you for sharing this tutorial, it is very useful. I have a quilt nearly finished that I want to label so this will be very handy.
Just catching up on your posts as ive not been blogging for a few weeks!
Have a lovely weekend!
Gill xx
Lovely. I am going to do this. Not now, later this year when I do my boy's blankie. Smaller version migh even work nicely on a crochet blanket?
ReplyDeleteUnderbart! Tack! Har funderat på hur jag ska märka mina täcken, och nu vet jag :)
ReplyDeleteHej! Hittade till din blogg i går när jag var på jakt efter bilder och tips på hur man gör ett lapptäcke. Jag ska göra mitt första :) Hur gör du kantbanden så snygga? Hur gör man i själva hörnet för att det inte ska bli fult? Tacksam för hjälp :)
ReplyDeleteHej Louise
ReplyDeleteHoppas du tittar in igen så att du kan läsa mitt svar. Diary of a quilter (finns i min blogglista och även i listan om tutorials jag har lärt mig av) har en fantastisk turtorial om hur mna görnlyckade kantband. Jag syr dem dock på maskin. Startar med att sy fast dom på baksidan och viker över till framsidan och sen syr jag sakta och lugnt på maskin från framsidan. Lycka till. Hojta till om du beh¨øver mer vägledning.
Annette
new to your blog, love it....was just exploring it when I stumbled across this lovely tutorial which made me fall in the love with the idea of a label, even though I had been averse to - but the idea of a blanket stitch totally made me rethink my stance. Love it! well done and thank you for making me fall in love with quilt labels, never liked them before.xx
ReplyDeleteI was taught that you should always include your full name (including middle name AND naiden name) and the year you finished the quilt. This is to help future generations identify the maker. We've all seen raggedy quils in thrift shops and have been curious about the maker.
ReplyDeleteThank you for sharing! I just started quilting and I thought labeling would be much harder than this, so glad its not! Must try this!
ReplyDelete