
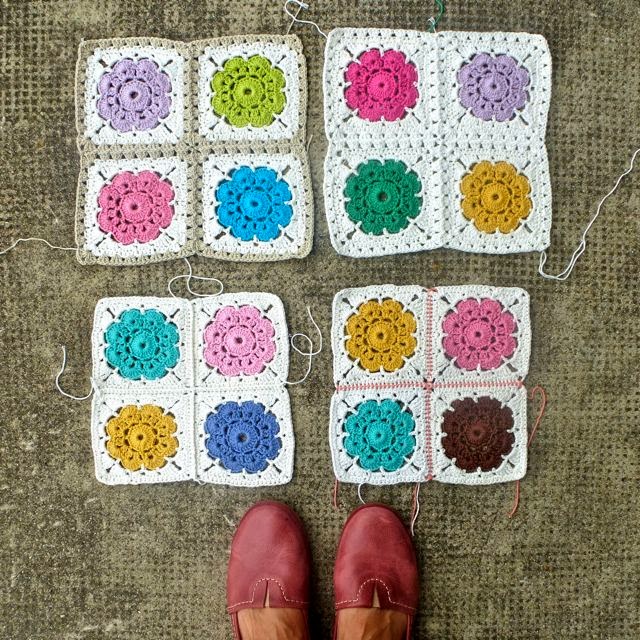
"How would you join the Maybelle Squares?" I don't know how many times I have received this question lately... But it is many times. And to be honest I didn't really know how I would join my Maybelle Squares. So I have spent my last week experimenting with different joining techniques, some that I have totally ditched half way through as I thought they were way to complicated and fussy (like Braid Join...), and in the end I have 3 ways of Joining The Maybelle Squares that I personally really like very much.Ia m sure many of you have a trillion Maybelle Squares just waiting to get joined so here we go.
♥ Top left is a Join-As-You-Go version by adding a row of granny clusters to your square in a contrasting natural color.
♥ Top right is also a Join-As-You-Go version by adding a row of granny clusters to your square but in the same color as your square.
♥ Bottom left is a Visible Join in the same color as your square color, worked from the front of your squares creating a 3D-ridge effect.
♥ Bottom right is a Visible Stitch Join with a contrasting color worked from the back of your squares.
So lets look a bit closer at these alternatives, shall we?


The picture collages above shows the Join-As-You-Go technique which is simply done by adding a last row of granny stitches to your square in a contrasting color or in the same color as your previous square rows. I personally think that the contrasting natural color is a great alternative for my multi colored Maybelle Squares. This joining makes the squares almost 1 inch/2 cm larger which makes up a blanket fairly quick. I can imagine a bed throw like this in just one solid color... Only white or grey or beige... How beautiful!!!
Do it like this:
1. Add a row of granny stitches, group of 3tr (UK)/group of 3dc (US), for your first square. Fasten off.
2. Join your second Maybelle Square by starting a third row of Granny stitches on to your second Maybelle Square and following the Join-As-You-Go tutorial here. Add on squares from the left to the right in rows.

Next up is the same technique I once used to join my Daisy Squares for my Daisy Square Pillow. A very simple joining that adds great interest to your creation. As you are joining on the front of your squares it makes a fun visible 3D-ridge effect. It is simpel and quick and you can use a contrasting color with fabulous results. If I was to make a multi-colored baby blanket from my squares for example, I could add a light pink joining for a girl and a light blue for a boy or a yellow for neutral.
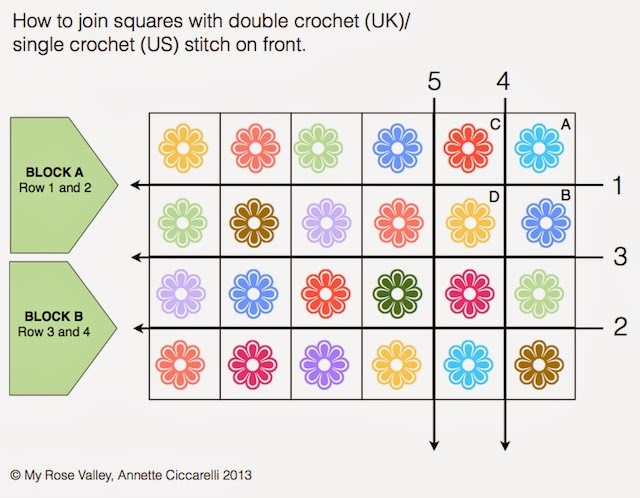
If you are right handed you will work this joining from right to left, if you are left handed you work from left to the right. Make sure you do this joining on horizontal rows first followed by vertical rows later to get the ridge symmetric through out your work. Also, to make it easier you can join two rows at the time into blocks, like you often do in patchwork, and then join your blocks together. See my chart above.
Do it like this:
1. Take square A and B and put bottom A edge towards top B edge wrong sides together. Join your yarn of choice and start by making a dc (UK)/ sc (UK) around the space in the right corner of both squares. Continue to work dc (UK)/sc (US) in the back loops of every stitch and in the spaces of the left hand corner before continuing with square C and D doing the same thing etc.
2. The easiest is to make blocks of 2 rows - Block A and Block B in chart - and later join these two blocks together as in Step 3.
2. When done joining all your rows horizontally you start joining them vertically as in step 4 and 5.
 Visible Stitch Join
Use this joining for a stitching effect on your creation. I wanted to make a sample out of 4 squares with the same color, maybe blue, and then use a lighter blue for the stitching join to show exactly what I had in mind, but I didn't have 4 squares in the same color left... So multicolor it is. Maybe I'll swop this picture later when I have a one colored swatch ready for you... :D I still think this kind of joining could be really nice to give more of a scrappy look.
You join your squares the same way as in "Visible Join with Ridge effect" but it is done on the wrong side of your squares and through both loops of the stitches. See chart in the above presentation and imagine it being the back side of your blanket instead of the front.
Do it like this:
1. Take square A and B and put bottom A edge towards top B edge right sides together. Join your yarn of choice and start by making a dc (UK)/ sc (UK) around the space in the right corner of both squares. Continue to work dc (UK)/sc (US) in both loops of every stitch and in the spaces of the left hand corner before continuing with square C and D doing the same thing etc.
2. The easiest is to make blocks of 2 rows - Block A and Block B in chart - and later join these two blocks together as in Step 3.
2. When done joining all your rows horizontally you start joining them vertically as in step 4 and 5.
Well, I am off to work now. I hope this was helpful. Happy hooking and don't hesitate to ask me if you bump in to problems or if anything is unclear.
Kärlek
Annette
Did you find this tutorial helpful?
Donate 1 dollar to support My Rose Valley Blog.
Thank You!
Donate 1 dollar to support My Rose Valley Blog.
Thank You!


Muy bonito,felicidades,bss
ReplyDeleteThese are so pretty - you must have great patience - you certainly have the skills. Your blog is always a delight to read ... also ... those shoes look very comfy!
ReplyDeleteHi , they are looking lovely.
ReplyDeleteI habe normally joined squares with the granny join as you go method but because the squares where either square or round grannies. I have just finished another blanket for my son and this time I have used the visible join with ridge edge method. It has come out lovely, I'll put the post up this week sometime. At the moment I'm weaving in the loose ends, I job I dont enjoy but has to be done. My favourite one of the ones above are the Granny join in a different colour and the ridge edge effect.
xEva
Thank you so much for such a comprehensive guide. The pictures are so clear. I like using different techniques for different projects.i have never used the visible joining stitch so was pleased to find a new way.
ReplyDeleteprecious tips!!!!!
ReplyDeletethank you, xxxxxx Ale
Thank you for taking time to post these methods, you're a treasure. I'll be sitting in front of my ipad later with crochet in hand. I'll be practicing your methods and seeing which one works best for me. I may have to do it several times before it kicks into my brain but what better way to spend an afternoon and I can do it without feeling guilty I'm recovering from surgery ;0)
ReplyDeletePeg xx
What a great post Annette!!! I think the next time, I will use the granny rows to join. I like that look. But I like them all. This is such a beautiful blanket to make!!!! Would love to be able to sit and stitch with you some day!!
ReplyDeletexo Kris
I did the DC method for mine and I'm really pleased with how it's coming along. Will let you see it first when it's completed. Thank you for helping.
ReplyDeleteSally xxx
All look pretty, but the khaki, the khaki! My favourite.
ReplyDeleteThank you for the excellent post. Your granny squares are beautiful.
ReplyDeleteDIne Maybelle Squares er helt nydelige. Jeg har ikke prøvd med på den teknikken enda, men når det gjelder å sette sammen lapper, så bruker jeg join-as-you-go og liker det best. Før sydde jeg lappene sammen, men foretrekker nå å hekle de.
ReplyDeleteTakk for dine hyggelige hilsener i bloggen, Anette! Alltid like koselig ;-)
Thank you for doing this! I'm planning to make a blanket with Maybelle squares eventually and was wondering what would be the best joining method.
ReplyDeleteEsta excelente el tutorial,muy interesante.
ReplyDeleteMil gracias por tu tiempo y por regalarnos estos colores tan bellos.
Cariños,GABY_MANOJITOSDEIDEAS.
You are amazing, very informative post, thank you.
ReplyDeleteHugs,
Meredith
What a fabulous tutorial Annette thank you so much, it really helped to see all the squares so closely and also your instructions are really clear - your blog is always a joy to read Annette. Have a wonderful week, lots of love as always
ReplyDeleteDorothy
:-)xxxxxxxxxxxxxxxxxxxxxxx
Amazing post. Well done. Thank you!
ReplyDeleteNobody said anything about your gorgeous shoes?????
ReplyDeleteThis a great tutorial post Annette! Thanks for going to all the trouble of doing this for us all to benefit from, I certainly will, and although have taught myself to join flowers using a join as you go method, I have yet to try with granny squares and will feel happier following a trusty tutorial such as yours!. I like the idea of using a contrast colour, it looks really good.
ReplyDeleteGill xx
Your maybelle squares are so addictive. I have been crocheting ALL day!! I was not sure how to join them and your very clear tutorial is giving me plenty of options. I look forward to trying them out. You are very generous to share this with us. Tusen Takk!
ReplyDeletei love the colours you have used in these. May I ask which yarn you used?
ReplyDeleteHi Jill
DeleteThank you for your message. The colors are divine aren't they? So fresh and fun. I'm using my Tilda yarn from Svarta Fåret when making these. It is a cotton/acrylic blend, 4ply. I sell it in my Yarn Shop. Welcome to visit:
http://myrosevalley.blogspot.ch/p/my-shop.html
Tilda yarn comes in more than 70 colors. I ship Worldwide.
Thanks for visiting.
Annette