

♥ Summer dressed
♥ Jeans shorts
♥ Too short skirts
♥ Outgrown T-shirts
♥ Old coats
♥ Curtains
♥ Your own jeans
♥ Tank tops
Crochet edging on pretty much anything imaginable. What a wonderful crochet world we will live in when everyone start making their own Crochet First Aid to all those boring, outgrown clothes we have at home. Recycling in its best manner, right? So lets get started.
You will need:
♥ Crochet hook suitable to your yarn (I am using 2,5 mm/2-C US)
♥ Sport weight cotton yarn (I am using Tilda from Svarta Fåret - purchase here.)
♥ Large eye needle with a sharp tip
♥ Scissors
The foundation is the most important part and that is the Blanket Stitch around the area that will have the edging. I suggest you do this with a DOUBLE thread for a stronger base. I did it with a single thread and I am sorry to say it has already broken in a couple of places as my Emmy Bo is a wild one...
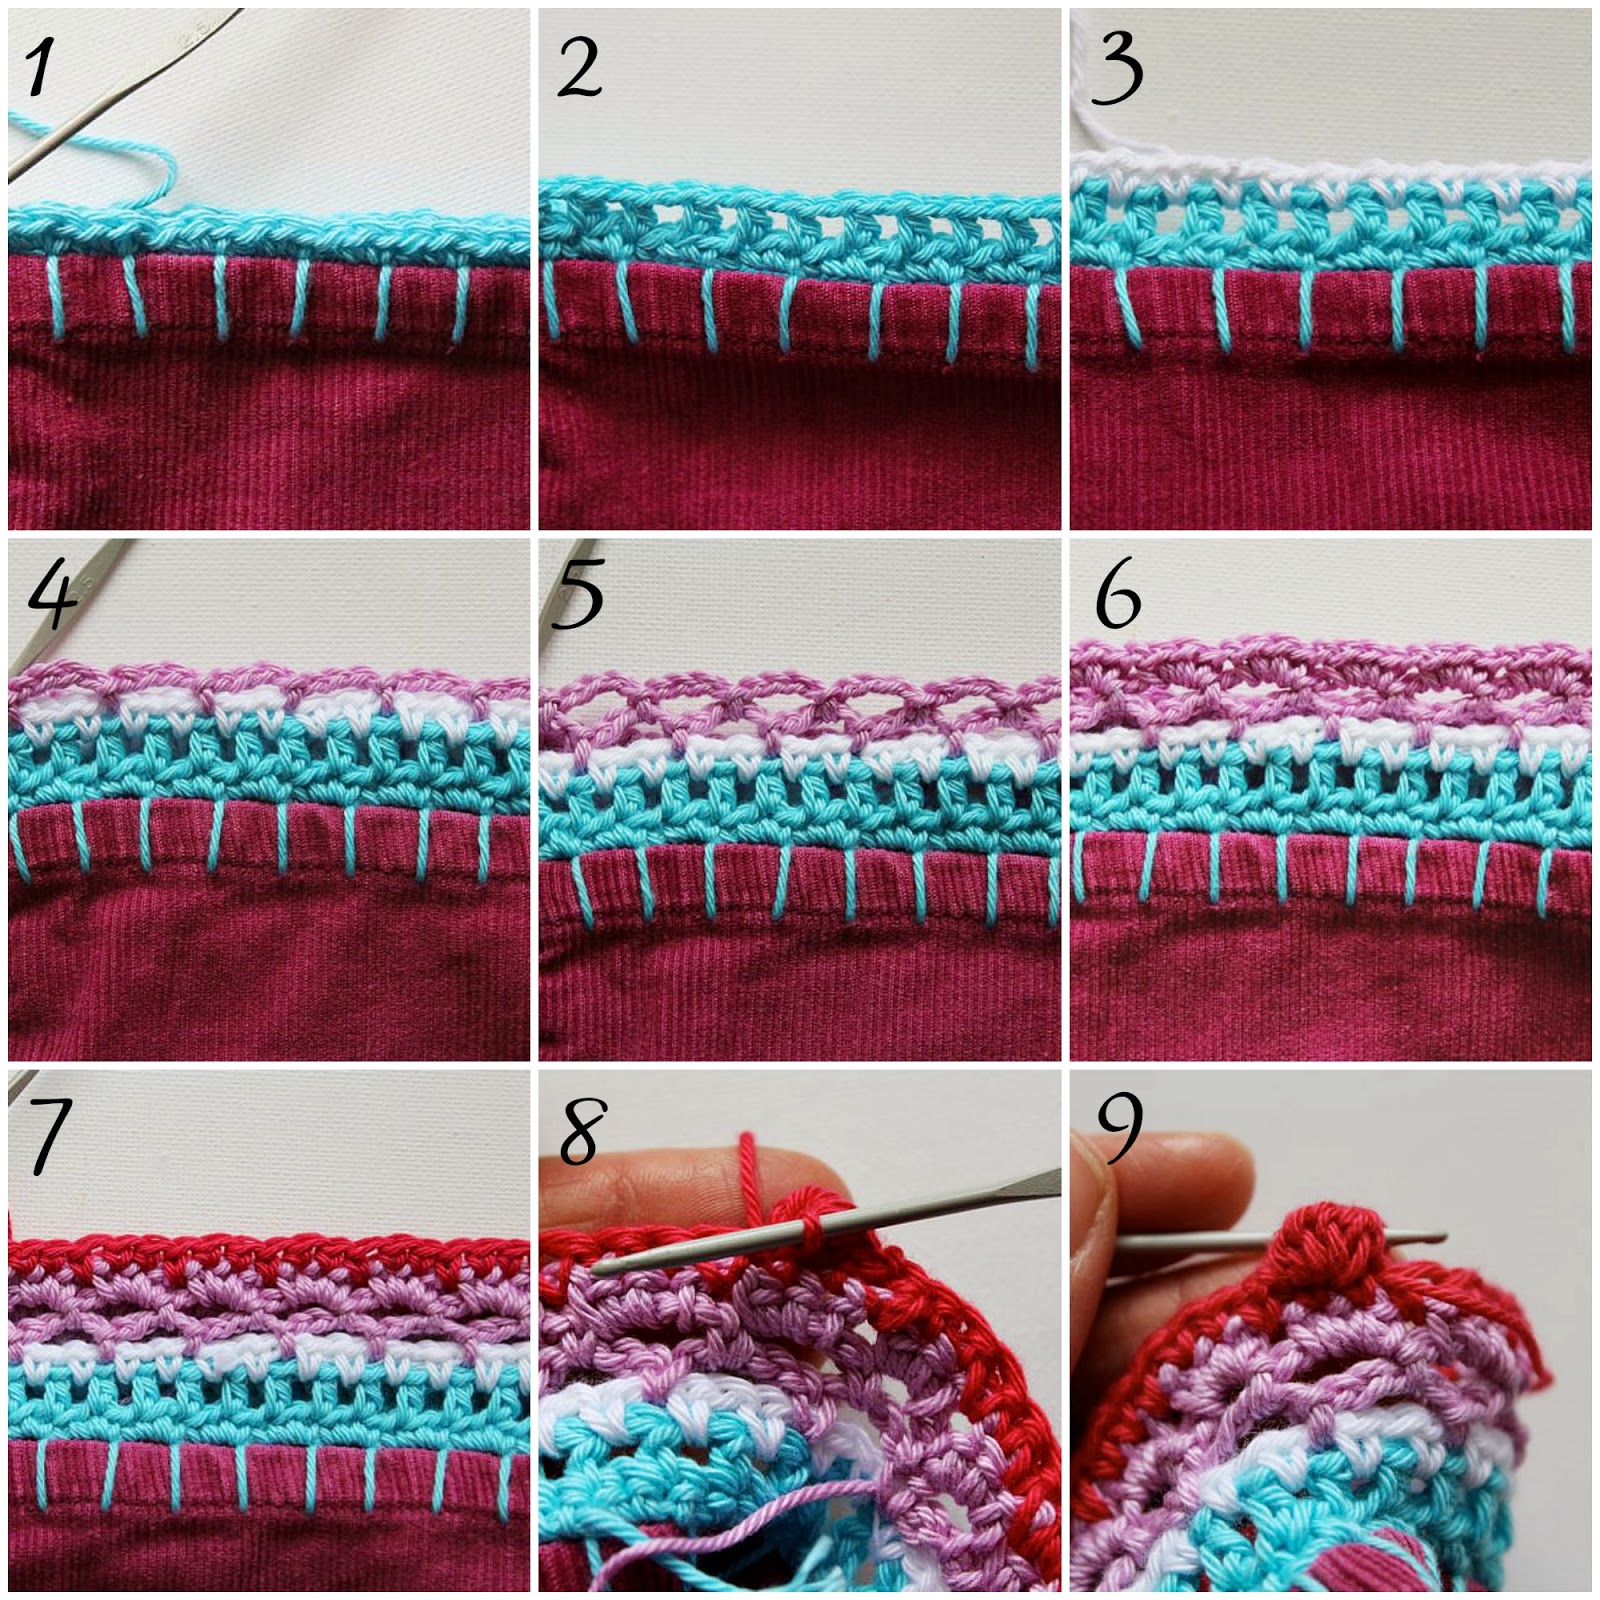
1. Double thread your sharp tip needle with a loooooong piece of yarn in your chosen colour. Make a knot at the end and start on the inside of the double seam of the pants leg. This makes for a good secure start.
2. Start your first stitch by sticking your needle through at the fold-up seam from the back to the front.
3. Now repeat another stitch from back to front (you can also do this from front to back but stay with your choice) about 3/4 inch/1 cm away working from your left to the right if you are right handed, from right to left if you are left handed.
4. When at the front, lead the needle underneath the previous stitch and pull carefully upwards until stitch is tight (not too tight!!!).
5. Repeat making stitches all the way around with approx. 3/4 inch/1cm in between.
6. When you come to the end it is time to close the row. You do this by leading your needle through the first stitch from the back...
7. ... pull through your yarn...
8. ... and tighten.
9. Secure your stitch on the back where you started. I secured it on the inside of the double seam. Now you have your foundation.
Here comes the fun part. You can of course alternate your own crochet edging with different stitches to make it longer or shorter, more or less open, solid or multi colored etc.
ABBREVATIONS UK
ch - chain
sl st - slip stitch
dc - double crochet (sc - single crochet US)
htr - half treble (hdc - half double US)
tr - treble (dc - double crochet US)
rep - repeat
Row 1: Start in any space and join color of choice. Ch1 and make 3dc (UK)/sc (US) in every space until end of row. Sl st in first ch to close row.
Row 2: Continue with same color. Ch3 (counts as first htr (UK)/hdc (US) + 1ch), skip 1 st, [htr (UK)/hdc (US) in next st - ch1, skip 1 st] rep [ ] until end of row. Sl st in 2nd ch of first 3ch to close row. Fasten off.
Row 3: Join new color in any 1ch-space. Ch2 (counts as first dc (UK)/sc (US) + ch), skip 1 st, [1dc (UK)/sc (US) in next st - ch1, skip 1 st] rep [ ] until end of row. Sl st in first ch to close row. Fasten off.
Row 4: Join new color in any 1ch-space. [Ch4 - skip 3 sts - sl st in next st (1ch space)] rep [ ] until end of row. Sl st in first ch.
Row 5: Continue with the same color. Sl st in 4ch-space - ch4 -sl st in next 4ch-space] rep [ ] until end of row. Sl st in first st to close row.
Row 6: Continue with same color. Sl st in 4ch-space - ch1, 3 dc (UK)/ sc (US) around 4ch-space. [4dc (UK)/ sc (US) around 4ch-space] rep [ ] until end of row. Sl st in first ch to close row. Fasten off.
Row 7: Join new color in any space between 4 dc (UK)/sc (US) around 4ch-space in previous row. [Ch1, dc (UK)/sc (US) in follow 2 sts - 1 dc(UK)/sc (US) in space between the 4 dc (UK)/sc (US) around 4ch-space in previous row] rep [ ] until end of row.
Row 8: Continue with the same color. Turn your work so that you work from the back side of your work. Make a [5tr (UK)/dc (US)-bobble, dc (UK)/sc (US) in next st - 5tr (UK)/dc (US)-bobble, dc (UK)/sc (US) in next st] rep [ ] until end of row. Sl st to close row.
HOW TO MAKE A BOBBLE: Instead of finishing your tr (UK)/dc (US) you only half finish your stitches and keep the loops on your hook. So, make 5 half finished tr (UK)/dc (US) in same stitch (6 loops on hook), yarn over and pull through all 6 loops. Tighten your stitch. Secure with a dc (UK)/sc (US) in next st. See great video tutorial here: The Bobble Stitch.
9. This is how the bobble will look on the front side of your garment. Enjoy playing with crochet edgings on anything imaginable.
Kärlek
Annette
Did you find this tutorial helpful?
Donate 1 dollar to support My Rose Valley Blog.
Thank You!
Donate 1 dollar to support My Rose Valley Blog.
Thank You!


Many thanks, another mystery solved for a beginner x
ReplyDeleteThanks for taking the trouble to post your tutorial, it's such a good idea - one I will be using. Have a great Sunday, Sam xx
ReplyDeleteso nice!!!! I think I could adapt it for some clothes in my wardrobe!!!!
ReplyDeletethank you, xxxxx Ale
Love this so much Annette - I have definitely got to try it soon!
ReplyDeleteS x
I just love this. That's for the tutorial. I have to go raid my closet for some pants that are too short. That might be a problem tho since I stopped growing a long time ago. LOL!
ReplyDeleteThanks so much... Can't wait to try this soon..
ReplyDeleteWhat a lovely idea!!! I'll remember about it :)
ReplyDeleteQue bonito y original,felicidades,bss
ReplyDeleteI have been wondering about this process. Thanks so much for the details. I've seen this on many towels, but the clothes are a great idea. Looks like a great addition even if clothes aren't too short. Love your combination of stitches.
ReplyDeleteThank you for that great Tutorial.
ReplyDeleteThis would maybe work as an edging on almost anything?
Hugs x
Thank you for sharing this crochetwork. Not only nice for trousers but also rather suitable for linen edges. GREAT!
ReplyDeleteDid I already tell you I'm having a giveaway for my blog's birthday?
Actually it is a bet and I should have 222 followers by the end of this week.
I'm afraid I'm not getting there.
Come and win some nice presents (now I sound like a creepy salesman in the Moroccan souks)
http://homeiswherethedachshundis.blogspot.be/2014/02/giveaway-willie-whale-and-pocheke.html
very creative and beautiful. thanks for sharing with us!!
ReplyDeleteThank you so much for this!
ReplyDeleteI was going to use it for my 2 sprouts but maybe I will try it for me first, you know, just to make sure :)
Thank you - I want to add an edging to some pillowcases - so it's useful to see a tutorial, as I wasn't quite sure where to start. x
ReplyDeleteSince I first saw this a while ago I wondered how it was done. Thank you for the tutorial and for expanding my knowledge!! xx
ReplyDeleteExcellent tutorial! :) Really inspiring :)
ReplyDeleteThank you for sharing this, my mother-in-law was a wonderful crocheter, and I have many items she made including towels that she added a crocheted edge to. She turned plain towels into fancy towels. I still have them and use them as guest towels in my bathrooms. She also added crocheted edges to curtains and many other items.
ReplyDeleteque lindo gracias por compartir el tutorial
ReplyDeleteThanks so much for this! I have two grand-daughters that are growing out of their clothes constantly. They are taking after their Daddy who is very tall.
ReplyDeleteHi Annette! I featured your lovely blog post/tutorial on my blog today.
ReplyDeletehttp://annemarieshaakblog.blogspot.nl/2014/03/link-your-stuff_8.html
Have a lovely day!
Best wishes, Annemarie