"How would you join the Maybelle Squares?"
 I don't know how many times I have received this question lately... But it is many times. And to be honest I didn't really know how I would join my
Maybelle Squares. So I have spent my last week experimenting with different joining techniques, some that I have totally ditched half way through as I thought they were way to complicated and fussy (like Braid Join...), and in the end I have 3 ways of Joining The Maybelle Squares that I personally really like very much.Ia m sure many of you have a trillion Maybelle Squares just waiting to get joined so here we go.
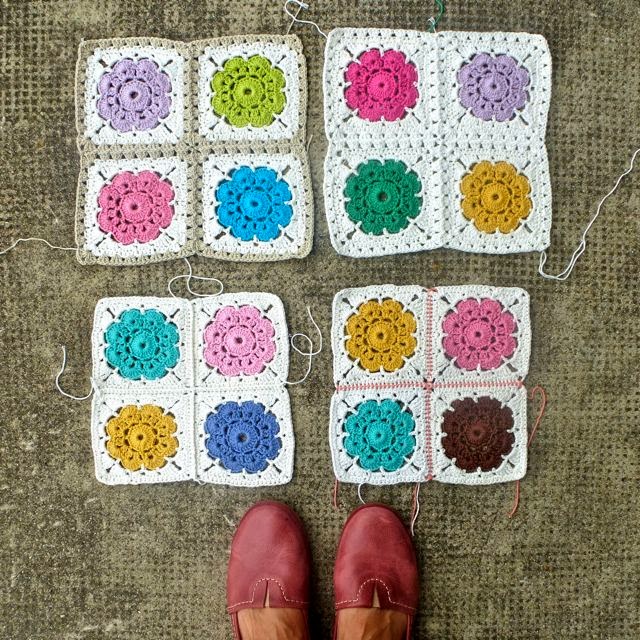
♥ Top left is a Join-As-You-Go version by adding a row of granny clusters to your square in a contrasting natural color.
♥ Top right is also a Join-As-You-Go version by adding a row of granny clusters to your square but in the same color as your square.
♥ Bottom left is a Visible Join in the same color as your square color, worked from the front of your squares creating a 3D-ridge effect.
♥ Bottom right is a Visible Stitch Join with a contrasting color worked from the back of your squares.
So lets look a bit closer at these alternatives, shall we?
Join-As-You-Go with granny stitches
The picture collages above shows the
Join-As-You-Go technique which is simply done by adding a last row of granny stitches to your square in a contrasting color or in the same color as your previous square rows. I personally think that the contrasting natural color is a great alternative for my multi colored Maybelle Squares. This joining makes the squares almost 1 inch/2 cm larger which makes up a blanket fairly quick. I can imagine a bed throw like this in just one solid color... Only white or grey or beige... How beautiful!!!
Do it like this:
1. Add a row of granny stitches, group of 3tr (UK)/
group of 3dc (US), for your first square. Fasten off.
2. Join your second Maybelle Square by starting a third row of Granny stitches on to your second Maybelle Square and following the
Join-As-You-Go tutorial here. Add on squares from the left to the right in rows.
Visible Join with Ridge effect
Next up is the same technique I once used to join my
Daisy Squares for my
Daisy Square Pillow. A very simple joining that adds great interest to your creation. As you are joining on the front of your squares it makes a fun visible 3D-ridge effect. It is simpel and quick and you can use a contrasting color with fabulous results. If I was to make a multi-colored baby blanket from my squares for example, I could add a light pink joining for a girl and a light blue for a boy or a yellow for neutral.
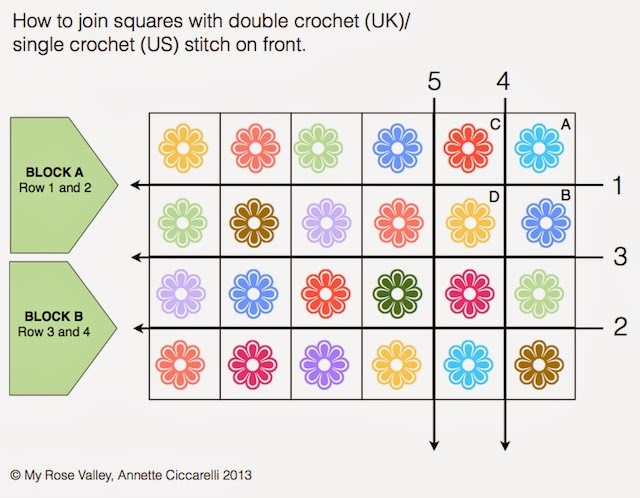
If you are right handed you will work this joining from right to left, if you are left handed you work from left to the right. Make sure you do this joining on horizontal rows first followed by vertical rows later to get the ridge symmetric through out your work. Also, to make it easier you can join two rows at the time into blocks, like you often do in patchwork, and then join your blocks together. See my chart above.
Do it like this:
1. Take square A and B and put bottom A edge towards top B edge wrong sides together. Join your yarn of choice and start by making a dc (UK)/ sc (UK) around the space in the right corner of both squares. Continue to work dc (UK)/sc (US) in the
back loops of every stitch and in the spaces of the left hand corner before continuing with square C and D doing the same thing etc.
2. The easiest is to make blocks of 2 rows - Block A and Block B in chart - and later join these two blocks together as in Step 3.
2. When done joining all your rows horizontally you start joining them vertically as in step 4 and 5.
 Visible Stitch Join
Use this joining for a stitching effect on your creation. I wanted to make a sample out of 4 squares with the same color, maybe blue, and then use a lighter blue for the stitching join to show exactly what I had in mind, but I didn't have 4 squares in the same color left... So multicolor it is. Maybe I'll swop this picture later when I have a one colored swatch ready for you... :D I still think this kind of joining could be really nice to give more of a scrappy look.
You join your squares the same way as in
"Visible Join with Ridge effect" but it is done on the
wrong side of your squares and through
both loops of the stitches. See chart in the above presentation and imagine it being the back side of your blanket instead of the front.
Do it like this:
1.
Take square A and B and put bottom A edge towards top B edge
right
sides together. Join your yarn of choice and start by making a dc (UK)/
sc (UK) around the space in the right corner of both squares. Continue to work dc (UK)/sc (US) in
both loops of every stitch and in the
spaces of the left hand corner before continuing with square C and D
doing the same thing etc.
2. The easiest is to make blocks of 2
rows - Block A and Block B in chart - and later join these two blocks
together as in Step 3.
2. When done joining all your rows horizontally you start joining them vertically as in step 4 and 5.
Well, I am off to work now. I hope this was helpful. Happy hooking and don't hesitate to ask me if you bump in to problems or if anything is unclear.
Kärlek
Annette
Did you find this tutorial helpful?
Donate 1 dollar to support My Rose Valley Blog.
Thank You!